There is no doubt that chickens can create a lot of waste, from spoiled bedding and uneated food to abundant fecal matter. This coop waste can be extremely polluting to the environment, creating odors in our yards and releasing ammonia into the atmosphere, not to mention the potential to attract pests and pollute groundwater. It can be very time consuming to bag and dispose of coop waste for delivery to the landfill. BUT, as detrimental as chicken waste can be, it can also be highly valuable as compost material.
The benefits of composting are numerous. When applied to dirt, compost transforms the ground into nutrient rich soil, with the right texture, pH, moisture holding capacity and nutrient content to foster healthy garden plants. Healthy plants are productive plants, and the fruits and veggies that they produce are more nutrient dense. Additionally, a healthy garden can be achieved inexpensively, without the need for costly additives or chemicals. Produce from the garden feeds people. The excess and scraps are fed to the chickens in the compost pile, and the cycle continues!
Benefits of Composting with Chickens
Composting with chickens saves money. Chicken feed is costly, and does not provide the diverse diet that is necessary for creating the healthiest eggs possible. When chickens are fed food scraps in a compost pile, some of their nutritional needs are met using waste materials. Additionally, the compost pile will contain bugs and worms that add protein to your hens’ diet while they provide pest control.
Composting with chickens is easy. The chickens provide aeration as they scratch through the pile, reducing how often the gardener must turn the materials with a pitchfork. The process is also simplified by eliminating the need for building layers of different types of materials, as is required by typical composting methods. In fact, if you try to build layers in a chicken’s compost pile, they will be undone in minutes!
Composting with chickens allows one to compost meat, cooked eggs and fish. These items can attract pests and are not typically recommended for composting. But, chickens will quickly gobble up these items before pests can get to them and essentially pre-compost them via digestion. Some chicken keepers prefer not to feed eggs to their hens, but they can be a good addition to their diet in moderation.
Finally, composting with chickens makes them happy! Hens naturally love to scratch, dig and forage. Bored hens can become lethargic and may even begin to pick on each other for something to do. Put them to work in your compost pile, and they will love it!
How Composting with Chickens Works
How does composting with chickens work? The first thing to remember is that compost is alive! Although it is made up of dead organic materials, living organisms that inhabit a compost pile do the job of breaking these materials down. Besides your hens, some of these organisms are visible, such as earthworms and ants. Others are invisible, in the form of bacteria and nematodes. Others are easily overlooked, as in fungi that grow below the surface, occasionally popping up out of the soil in the form of mushrooms.
These living organisms need nutrition, air and water to thrive. So, it is important to provide each of these three necessities in your compost pile. In the next few pages, I will break down each step individually.
First, feed your compost pile. It needs a steady diet of organic materials that are referred to as ‘browns’ and ‘greens.’ These terms will be explained in the next few pages. But, for now, the simple recipe to follow is to feed the pile approximately 3 parts ‘brown’ material to 1 part ‘green’ material. This is not an exact process, especially when you are composting with chickens, so there is no need to measure the materials. Just remember to go heavier on the ‘browns’ than the ‘greens.’ Here are some examples of ‘brown’ and ‘green’ materials.
‘Browns’ are organic materials that have been dead for a while. Often, dead materials turn brown, as is the case with fall leaves and pine needles. But they are not always brown in color. What they have in common is a high carbon content, a necessary component of healthy compost piles and soil.
‘Brown’ materials that you can add to your compost pile include straw, shredded paper and sawdust. ‘Brown’ materials are often dry, and may have been processed in some way (as is newspaper.) They tend to decompose slowly, and are not typically attractive to pests, such as flies. Although some of these items are inedible, chickens are pretty good at distinguishing edible items from those that are not good to eat. They will scratch through the brown materials and will pick at them, looking for edible morsels. But you do not need to worry that they will ingest inedible materials in harmful amounts.
If you use hay, wood chips or straw as bedding in your chicken coop, you will automatically have plenty of ‘brown’ materials for your compost pile. In our chicken coop, we place fresh bedding only in our nesting boxes. When the boxes become soiled, we sweep the bedding onto the floor of the coop and replace it with fresh straw. Periodically, we rake the straw from the coop floor out the door into the run, where our compost pile is located. This rotation allows the nesting boxes to be refreshed regularly, and ensures that spoiled straw makes it to the compost pile without a lot of extra work.
‘Greens’ are organic materials that were recently alive, as in scraps from a dinner salad. They are most often fresh, as is the case with grass clippings. But, sometimes they are processed biologically, as is manure. What they have in common is a high nitrogen content, which is a valuable food source for chickens, as well as for the microorganisms that inhabit compost piles, and ultimately for garden plants. They tend to have a high moisture content and break down quickly. The list above is only partial; there are numerous sources of ‘green’ material, too many to mention here. Start with the easy ones; salad scraps, grass clippings and landscape trimmings. Throw in crushed eggshells, mixing them well with other materials so that the birds do not recognize them.
If you have other animals on your farm besides chickens, the waste and bedding from their cages and enclosures are a great addition to a chicken compost pile and are not harmful to the birds. Pet manure is considered a ‘green’ material, and it is often mixed with ‘brown’ bedding. The chickens will help to break down these materials quickly, preventing odors. As they scratch through it, they will find food morsels and bugs to enjoy. Although most manure is fine to compost, avoid composting waste from carnivorous animals, such as cats and dogs, as they may contain pathogens that are harmful to birds and to humans.
You may have noticed that I left coffee grounds and tea leaves off of the list of ‘greens.’ Although these are wonderful items to compost, I do not recommend using them in a chicken composting system as the caffeine can be harmful to the birds.
In addition to those already mentioned, many items can be added to compost piles, saving a lot of waste from ending up in the landfill and putting discarded items to good use in the landscape. Once again, this list is not exhaustive. There are endless sources of materials that can be composted, some of them surprising! If your dog or cat food goes bad or becomes infested with bugs, compost it! Moldy food and freezer burned veggies are also a great for composting, and won’t harm your birds. Even paper towels are okay to compost with chickens, as long as they have not been used for cleaning with chemicals.
Search on the internet or ask experienced composters for their recommendations. If you have the space, compost as much material as you possibly can. The materials tend to shrink as they decompose, so it can take a lot more material than you might expect to create enough compost to fill or amend a garden bed.
Dairy products can be added to the pile, but in moderation. A small amount of cheese is generally not harmful to birds, and many people feed yogurt to their hens regularly. However, large amounds of dairy products, particularly those that are greasy, should be avoided. Avocado and anything particularly fatty or greasy can harm chicken digestion. Tomato vines and leaves, as well as green potatoes and potato skins are toxic to chickens. I recommend also refraining from adding anything sugary or caffeinated to your chicken compost pile. These items are composted separately on my farm.
Where to Locate the Compost Pile
On our farm, the pile is located in the run, behind the coop. Moisture is added to the pile by emptying troughs and buckets on the pile when we refresh our hens’ water. The chickens have continual access to the pile, and are constantly at work creating compost.
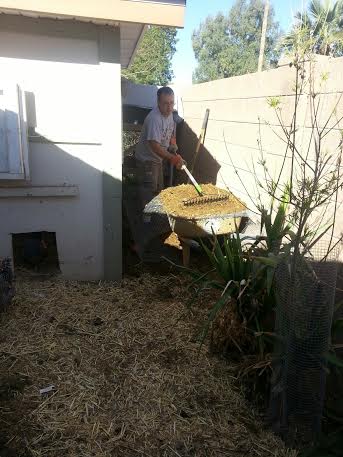
In the photo at the top of the page, my husband is sifting compost behind our coop. Materials that are not sufficiently broken down are thrown back into the pile, and sifted contents are wheeled out to the garden.
What Compost Needs
Compost requires 5 basic ingredients: organic matter, organisms, water, oxygen and maintenance.
Let’s start with organic matter, which is ‘food’ for the compost pile. We have discussed the brown and green organic materials to feed our compost. These also provide nutrtion and a varied diet for chickens, who will be motivated to scratch through the pile. This scratching provides aeration, exposing the materials to oxygen. Aeration ensures that the pile will break down aerobically, a form of decomposition that is fast and has few odors.
Water is added to provide proper moisture levels for fast decomposition. The goal is to keep the materials roughly as damp as a wrung-out sponge. During dry seasons, or if your pile is covered from the rain, empty and rinse the watering devices in your chicken run onto the compost pile or add some water with a hose.
If your compost pile is on the ground, touching the native soil, decomposers will naturally find the compost pile. Microorganisms, bugs and worms in the environment will be attracted to the moisture and the organic materials. Chicken manure also contains bacteria that helps the compost pile to decompose.
Maintenance makes the difference between a pile that decomposes quickly and one that stagnates. Untended piles break down very slowly. The farmer’s job is to monitor moisture levels, making sure that the pile is neither sopping wet, nor bone dry. Moderately moist compost breaks down quickly, without foul odors. The chickens will do the work of turning and aerating the materials, but they tend to kick and scatter contents out of the pile. Therefore, if your pile is open, it is necessary to periodically rake materials back up into a pile formation.
As the pile begins to grow, the chickens will no longer be able to aerate the deeper layers. Periodically turning the pile with a pitchfork will keep the materials breaking down quickly, although on our farm, this is a very rare chore. We sift and use the compost often enough that this provides adequate aeration to the deeper layers.
Getting Started
Step 1: Collect Household Scraps.
To start your pile, begin collecting household scraps. Keep a small container in a convenient place in the kitchen for food waste, and transfer the contents regularly to the compost pile outside. Make sure that your bin has a tight fitting lid to prevent fruit flies our houseflies from populating it.
To build your pile quickly, use landscape trimmings for green material, and shred your newspapers and circulars for brown material. Ask friends and neighbors for the papers, junk mail and scraps that they would otherwise discard, or ask your local café for scraps.
Step 2: Feed the Pile a Balanced Diet
In a typical composting system, one would start by building layers of brown and green materials, like building a lasagna. But with chickens, building layers is futile effort. Instead, try to keep the 3:1 ratio of ‘browns’ to ‘greens’ in mind, and let the chickens mix them up. Remember that it is not as important to provide exactly three times as many ‘browns’ as ‘greens’ as it is to simply shoot for stocking the pile heavily with carbon-rich ‘brown’ materials.
In a typical compost system without chickens, it is recommended to always finish with a layer of brown materials on top of the pile that will deter pests and prevent foul odors. Since this is not possible to accomplish with chickens, we use food grade Diatomaceous Earth (DE) to deter flies. Chickens keep most pests uner control, but flies can be a problem during warm seasons. By sifting DE on top of the pile, the fly population is minimized. DE is not harmful to chickens, but be certain to purchase food grade or garden grade DE, as opposed to pool grade DE that is not appropriate for farm applications. DE can be found online, as well as at feed and garden stores.
Step 3: Keep the Pile Hot
Once the pile begins to grow, begin to add moisture. Try to keep it as moist as a wrung out sponge, neither completely dry nor dripping wet. The addition of moisture will begin to activate the microorganisms in the pile, and their activity will cause the temperature to rise. The pile will become warm or hot to the touch. This means that your pile is breaking down quickly!
Visit the pile every few days and put your hand into the materials to feel the temperature. If the chickens scatter the materials, rake them back up into a pile. It may be helpful to create a wall or barrier to keep the materials sequestered. Scattered materials do not heat up for fast decomposition, so it is helpful to keep them piled up.
If the pile cools and decomposition stalls, use a pitchfork or a shovel to stir or turn the materials so that some of the material that was at the center of the pile is moved to the edges, and the material at the edges moves to the center. Add enough water to keep the pile moist, and it will begin to heat up again. Chickens love it when the pile is turned, and will show a renewed interest in scratching through the contents. Repeat this process until the pile no longer responds to turning and watering by heating up.
Step 4: Cure It!
When your compost pile no longer heats up, and the materials look and smell like soil, your compost is now ‘finished.’ Stop turning and watering the compost pile and let it rest for a few weeks. This is called ‘curing,’ and it is an important step in the process. On our farm, we removed finished compost from the chicken run and allow it to cure in a pile near our gardens or in a fallow garden bed.
While the compost cures, it is breaking down any harmful bacteria that may be harbored in the material. Additionally, chicken compost tends to be very rich in nitrogen, which can have what is referred to as a ‘burn’ effect on garden plants. Curing transforms this nitrogen into a form that plants are able to uptake and use, and reduces this ‘burning’ effect. While your compost cures, continue composting in your chicken run so that you have an endless supply of soil amendment for your garden.
Give Chickens a Balanced Diet
Chicken feed is balanced to provide just the right amount of nutrients that chickens need to maximize egg production. Although there are many benefits to providing chickens with a varied diet, including healthier eggs, the number of eggs and shell quality can drop if hens do not receive enough protein and minerals, particularly calcium.
Here are some tips:
1. If egg production drops, add protein in the form of fingerling fish food, legumes, mealworms, scrambled eggs, ‘harvested’ roaches, or commercial ‘feather fixer’ feed.
2. Supplement compost materials with quality commercial feed, or make your own. An equal combination of whole grain oats, wheat and barley, plus lentils and black oil sunflower seeds makes a healthy feed.
3. Nutrition is boosted by soaking the grains and lentils overnight or until they barely sprout. Soaking and sprouting can increase the nutritional value of seeds 300%.
4. If eggshells are soft, feed hens free choice oyster shell, leafy greens or crushed eggshells to provide calcium and other minerals. Make sure that the eggshells are mixed with other food items so that they are not recognizable to the birds.
5. Chickens do not have teeth, so they will ingest hard, indigestible items that act to grind up softer food particles. If your chickens do not have access to sand or small pebbles, provide them with grit purchased from a feed or pet store.
Troubleshooting
A healthy compost pile should break down quickly, be free of foul odors, and not attract pests. In the event that the pile begins to emit unpleasant odors, it may be due to excessive moisture or lack of aeration.
If the pile is dripping wet, add some dry, brown materials and turn the pile.
Piles that have too little aeration due to compaction of the materials can be turned, and possibly separated into two separate piles if excessive material weight is causing the problem.
An ammonia odor signals excessive nitrogen content in the pile, in the form of green materials, coupled with too much moisture. Turn the pile and add a heavy dose of brown materials to alleviate the problem.
A fresh pile that won’t activate and heat up may be due to several conditions. If the pile is too small or the weather is cold, increase the size to provide some insulation that will retain the heat. One cubic yard is a nice size that will heat up, but does not become too large to manage. In cold climates, a pile that heats up will not only break down more quickly, it will also help to keep your chickens warm.
A dry pile will remain cool, as well as a pile that does not have access to enough oxygen. Add water, and aerate by turning the pile and adding aeration holes, as needed.
Finally, a cool pile may be due to insufficient nitrogen, in the form of green materials. Although a 3:1 ratio of browns to greens is the general rule, if the pile does not heat up, activate it with the addition of green materials. Particularly effective green materials to activate compost pile are grass clippings and manure.
Finally, chickens do a good job of taking care of insect pests. But they will not deter large or nocturnal animals, such as raccoons. If pests become an issue in your bin, cover the pile with a thick layer of brown materials. You may need to build or purchase an animal proof bin with a tight-fitting lid or cover aeration vents with mesh screening, letting the chickens into the pile during the day and closing it up at night.
Make certain that you have not added materials to the pile that are particularly attractive to pests, primarily meats and cheeses. Finally, tend your compost pile so that it heats up sufficiently to be uncomfortable for pests to inhabit.
Using Compost
Now that you know how to create quality compost, let’s put it to work! Start by sifting or picking out large pieces that have not decomposed sufficiently. Throw them back into your working compost pile to decompose some more.
When starting a new garden, turn compost into the native soil. For an existing garden bed, work compost into the soil gently, using a garden fork. Compost can also be added to potting mix for container gardens, and used to fill raised beds. Some of your finished compost can be added to a new compost pile to activate it.
Since chicken compost contains manure, I recommend only using it at the beginning of the growing season. By doing so, you will not be adding potentially pathogenic material to your garden near harvest time. Pathogens, such as E.coli and salmonella, can be harmful to humans.
Compost can also be used as a mulch layer that is spread on top of the soil like a blanket. The addition of a mulch layer does wonders for a garden, reducing weed growth and moderating soil temperature. It also helps to retain moisture by allowing rainwater to seep more easily into the soil and reducing evaporation.
As the mulch breaks down, it becomes part of the soil profile, improving soil texture and nutrient availability. Add a layer of mulch seasonally, after planting.

