
Water Your Plants From Below
Wicking beds are a unique way to grow vegetables that waters them from the bottom up. Unlike traditional gardens that require good drainage, wicking beds are self-contained, highy productive garden beds with water reservoirs that supply moisture to plant roots from the bottom up – transforming not only how you water your garden and how often, but also how much water you need to use to keep your veggies happy. In this article, we’ll discuss how wicking beds work and how to make your own. We’ll also show you how to add a worm tower to your wicking bed to make it even more productive.
How Do Wicking Bed Gardens Work?
A wick works by capillary action, similar to the way a dry paper towel absorbs water. In a simple wicking bed, the soil acts as a wick that is suspended above a water reservoir, pulling up moisture at points of contact with the water. As the moisture in the soil is used by the plants and is lost to evaporation, the soil absorbs more water from the reservoir, providing plants with a continual water source.
As a Master Gardener and manager of a plant nursery, I am often asked, “How much should I water my plant?” The answer depends on many factors, but a good rule of thumb is to try to keep the soil as moist as a wrung-out sponge, neither too dry nor sopping wet. Additionally, water should reach a depth of at least 1 foot for vegetables (2 feet for tomatoes and other large veggie plants.) In a traditional garden in the ground, this moisture level is difficult to achieve and will not be constant. In contrast, a wicking bed garden maintains even moisture levels that contribute to plant health.
How to Make a Wicking Bed Garden
1. Select a container to hold your garden. The container should be non-toxic, sturdy and able to hold water. The ideal depth is 18 to 24 inches. Shallow containers do not have enough depth for plant roots to grow; deeper containers will be unable to wick the water to the top of the soil.
Note that veggies planted in a wicking bed can thrive in a shallower soil depth than those planted in the ground. In my opinion, 10 inches of water and 10 inches of soil is ideal for most vegetables in a wicking bed.
2. Select a location for your garden. If you want to grow vegetables, choose a spot that receives at least 6 hours of sunlight each day. If yo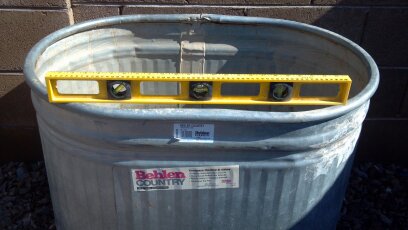 u live in a hot, sunny climate, provide some afternoon shade. The bed should be near enough to a water source so that it is easy to refill, when necessary. I also recommend placing the bed in a location that you visit often so that you don’t have to make a special trip to check on it or to harvest the produce.
3. Level the garden bed. Make certain that the bed is level so that water is distributed evenly in the reservoir.
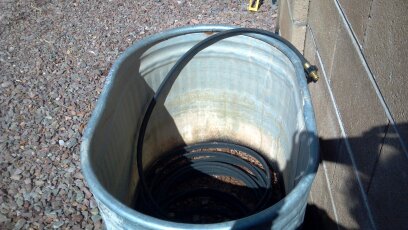 4. Run a pipe or drip hose from the top of the container down into the bottom, stretching it along the length of the water reservoir. This pipe will allow you to add water to the reservoir and distribute it evenly throughout the bottom of the bed. Use a piece of perforated PVC pipe, weeping tile or a strong drip hose (aka soaker hose) that won’t easily be pinched when soil is piled on top of it. The pipe or hose should run up the side of the bed and stick out of the top of the soil to make the reservoir easy to fill.
In a small wicking bed, you may not need to run pipe along the bottom of the bed. All you would need is a pipe leading from the top of the soil down into the reservoir for adding water.
5. Fill the bottom of the bed with a 5-10 inch layer of clean gravel, covering the pipe. Use a medium gravel size of 1-2 inches so that there is a lot of space between the rocks for water to flow. The gravel should be no more than a foot in depth.
Because a wicking bed is a closed system, I recommend using new gravel that is clean and sterile. Gravel from your yard may carry pathogens that could grow in your wicking bed and damage or kill your plants. If you want to recycle old gravel, wash it with some bleach or lay it out in a single layer in the sun for several hours to disinfect it.
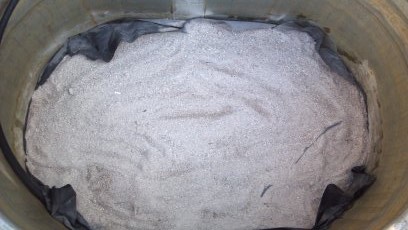 6. Line the bed with landscape fabric to separate the water reservoir from the top layer of soil. Cut a piece of permeable landscape fabric to fit the bed and lay it on top of the gravel. The edges of the fabric should run up the sides of the bed to prevent soil from falling down into the water reservoir.
Do not use plastic that is not permeable, or water will not be able to wick through it up into the soil.
7. Cover the landscape fabric with 1/2 inch of sand. The sand will help to keep the soil level in the bed. Do not make this layer too thick or it will impede wicking of the water up into the soil.
8. Add drainage holes or a drainage pipe. Drill a couple of holes in your garden at top of the reservoir, the level of the bed where water will meet the soil. If you live in a very wet area that gets a lot of rain, a drainage pipe should be added to allow water to escape the bed quickly to prevent the soil from becoming waterlogged.
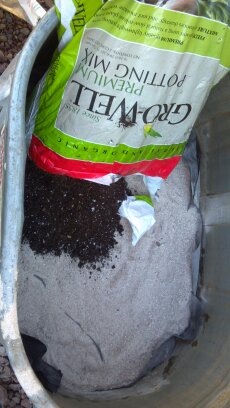 9. Fill the bed with soil. Choose an organic potting soil that contains compost and/or nutrients. The dept of the soil should be 9 inches to 1 foot.
I recommend using a good quality potting soil rather than filling the bed with native soil that may not have a good texture for wicking and holding water. Additionally, native soil from your yard may contain pathogens that should not be introduced to your wicking bed garden.
Add some vermiculite, perlite or pumice to help the soil hold water and help to prevent fungus and mildew problems. Soil amendments also reduce soil compaction that can occur over time. These amendments can be purchased at any garden or home improvement store. Follow the instructions on the bag for how much to add to your bed.
10. Add plants to the garden. I recommend transplants rather than seeds to reduce the amount of time that you will need to water from the top while plants get established. Seeds require co nstant moisture in the top inch of soil in order to germinate, and this area of a wicking bed is the driest when watering from the bottom.
11. Fill the reservoir with water. Use the exposed pipe or hose to fill the bottom of the bed with water up to the soil line. Fill until water runs out of the overflow pipe or holes.
12. Water from the top to start wicking action. Water deeply enough so that water from the top reaches the water in the reservoir. Once wicking action starts, the soil deep in the bed will remain constantly moist, although the top several inches may feel dry. You may need to water from the top for a week or two until transplant roots grow and reach down into the moist soil.
13. Mulch the top of the soil. Spread a layer of wood chips or straw on top of the soil to reduce evaporation and help to regulate soil temperatures. Do not pile mulch up around delicate plant stems.
Wicking Bed Maintenance
Feed Your Plants. When your transplants are established and growing, add some organic fertilizer to the bed. Options are water soluble nutrients that can be placed in the water reservoir or dry fertilizer that is worked directly into the soil. Follow the directions on the package for how much to add to your garden.
Refresh the Water. Add water to the bed once each week, filling the reservoir until water begins to drip out of the drainage holes. Several times each year, flush the bed to remove old water and replace it with fresh water. This will help to keep salts from building up in the reservoir and prevent the overgrowth of algae and bacteria. If you notice brown tips or edges on your plant leaves, it may be a sign of salt damage that can be relieved by flushing the bed.
Prevent Mosquito Infestation. If mosquitoes are a problem in your area, use a rubber band to secure a small piece of window screen over the opening of the fill pipe and drainage pipe to prevent mosquitoes from accessing the water in the reservoir. Small pieces of screening material are usually sold at home improvement stores for patching screens, and are the perfect size for covering your pipe openings.
Refresh the Soil. When the bed is dormant, add some fresh compost to the soil prior to replanting to refresh it for the next growing season.
Add a Worm Tower to Your Garden
Add worms to your wicking bed to add nutrients to the soil and help to reduce compaction that can occur over time. Worms love moist soil, and a wicking bed can be the perfect environment to raise them.
Make a Worm “Tower” Feeding Tube. To create a feeder for your worm farm, cut off the bottom of a clean 2-liter plastic soda bottle and drill or punch 10-15 holes all over the sides. Holes should be 1/4-1/2 inch in diameter to allow the worms to enter and exit the tube.
Place the bottle, top down, into the soil in your wicking garden. Leave an inch of the bottle sticking out of the top of the soil.
Add Worms. Place beneficial earthworms, such as Red Wigglers, into the bottle. Fill the bottle with lettuce, grass clippings, or vegetable scraps that the worms can eat. (See the links below for more information about raising worms and what to feed them.)
Cap the Tower. I used the tray from a small poultry watering jug as a lid for the tube. A bowl or flower pot dish could also be used to cover the hole. Secure the lid with a rock or a brick so that it does not blow off. keep the tube covered to prevent moisture loss, opening it only to add food.
Feed the Worms. Add food to the tube regularly. Worms will eat the food and, in exchange, will deposit “fertilizer” into your soil. As the worms tunnel through the garden, they do the job of aerating and loosening the soil to prevent compaction that can damage plant roots.
Regulate the Soil Temperature. In very hot climates, small wicking beds may become too hot for worms to thrive. Provide some protection from direct sunlight. My own beds are metal, which I have draped with burlap to mitigate the heat. In the hottest summer months, I cover the beds with shade cloth.
During the winter, if a hard freeze is expected, remove worms from the wicking bed and house them indoors in a worm bin. (See links below for instructions for building your own worm bed.)
More About Wicking Beds and Worm Towers
- Vermicomposting: Waste Reduction and Worms
Questions and answers about vermicomposting and California’s waste reduction efforts provided by the California Department of Resources Recycling and Recovery. - How to make a Worm Tower: Milkwood: permaculture farming and living
A worm tower is a simple and effective way to take any garden bed from average yield to gloriously abundant. Simple to build… - How to Make a Worm Bin
Worms eat kitchen scraps and create worm castings, which are a valuable soil amendment and plant tonic. Though castings are often called fertilizer, they’re actually not very high in nitrogen, but they are full of plant-supporting nutrients. - From the bottom up – A DIY guide to wicking beds
Wicking beds are a unique and increasingly popular way to grow vegetables. They are self-contained raised beds with built-in reservoirs that supply water from the bottom up – changing how, and how much, you water your beds. In this article, we’ll tal - How to Make a Wicking Bed: Milkwood: permaculture farming and living
A wicking bed is an excellent technique for growing things in environments where water is scarce, and has two main parts. The bottom half is a contained reservoir filled with gravel and water and the top half is filled with soil, mulch and plants. By - Wicking Bed Fact Sheet
Wicking Bed…Not Your Average Garden Bed.

