Not Your Grandparents’ Tomato Canning Recipe
I love a well-stocked pantry filled with home canned goods. The sight of those beautiful jars reminds me of visiting my grandparents in Wisconsin and going downstairs with my grandfather, known to me as Opa, to retrieve a jar of the most delicious pickles that he had canned from his large garden. One of my grandfather’s specialties was growing delicious tomatoes. Years after he was gone, our family drove by the house in which my father had grown up. A neighbor was outside, so we stopped to chat and reminisce. I commented that I was sad to see that that the garden was gone, and the neighbor replied that my grandfather had been the most wonderful gardener, giving her tips that improved her tomato harvest, even though she had been growing them for years and thought she had known everything their was to know about them.
Today I have my own garden and I grow bushels of tomatoes. As my grandparents did, I love to preserve the harvest by canning, although my techniques are different from the ones that they used. In years gone by, home canners relied on experience and techniques passed down to them by their parents and grandparents.
Things have changed. Today, we have the benefit of using techniques developed by scientific research and are able to keep up-to-date on the latest USDA recommendations via the internet. Numerous university extension offices offer classes and canning advice based on university research. Additionally, there are hundreds of “how to” books ad canning cookbooks, as well as online blogs and recipe databases written by experts and gifted amateurs. Canning enthusiasts are able to update heritage recipes to make them healthier and safer, and try new recipes that may become the cherished heirloom recipes of tomorrow.
While there are many different canning techniques, this article will explore preservation techniques for safe and delicious canned tomatoes. I have included links to recipes and more information at the end of the article. Near the end, I have posted one of my favorite vintage recipes, and I hope you will give it a try!
What’s so great about standing over a hot stove in the summer to can tomatoes?
At the end of a day of canning, I resemble a factory woman from Upton Sinclair’s “The Jungle,” with my limp hairdo, shiny face and dirty apron. But unlike his downtrodden characters, I feel triumphant, savoring the work of my hands and the knowledge that my family will enjoy the flavors of summer all winter long.
In addition to preserving excess harvest for the leaner gardening months, canning tomatoes has a host of benefits. I enjoy the convenience of having a well-stocked pantry so that I don’t have to run to the store for staple items, such as tomato paste and diced tomatoes. By canning my own tomatoes, I control the ingredients and my family avoids BPA contamination that can be present in tomatoes preserved in commercial metal cans (see our links below for more information.) Canning stretches our budget. Hint: even if you don’t grow your own fresh tomatoes, you can buy them when they are on sale in the market and preserve them to use when the price goes up in the winter.
Finally, I love to give homemade sauces and salsas as gifts. A basket filled with homemade spaghetti sauce, gourmet pasta and Parmesan cheese makes a unique birthday present or holiday gift. My kids are proud to present their teachers with a pretty jar of salsa adorned by raffia ribbon to show their appreciation in a small, but personal way. And a jar of tomato soup with a loaf of rustic bread can aid the recovery of an ailing friend.
A word of caution
Danger lurks in improperly processed canned goods.
Safe canning is much more than not stacking your jars too high, like those in our photo (and much more critical to your health.) Before we proceed, I want to make you aware of the danger of Clostridium botulinum, a killer that leaves no detectable clues to its presence: no color or taste change, no mold, and no odor. It can thrive in a perfectly sealed jar that has not been prepared properly or heated sufficiently.
Be certain to adjust any of your favorite recipes or techniques that were created before 1985, updating them to current standards. Avoid contamination by following current USDA guidelines exactly.
There are two important changes that pertain to tomato canning. It is no longer recommended to “cold-pack” tomatoes for processing. And tomatoes are no longer considered to be acidic enough to pack without the addition of an acidifying agent. The instructions in this article conform to current standards for safe canning.
Do not eat foods that show signs of spoilage:
- Unsealed jars
- Swollen lids
- Dried food on the jar walls
- Discolored foods
- Rising air bubbles
- Unnatural odors
- Mold growth on food or underside of lid
- Spurting liquid
If you suspect spoilage, dispose of the jar, lid, seal and food contents in a closed, heavy garbage bag. If the jar has been opened, clean any area that the food touched with a bleach solution (1 part bleach to 5 parts water) and paper towels, using gloves. Bag towels and gloves before disposing. Wash hands thoroughly with soap and hot water. Refer to the link section of this article for more detailed instructions.
Safe canning guidelines
Tomato selection
Quality
Choose tomatoes that are free of disease, vine-ripened, and firm. Avoid tomatoes that are severely cracked, bruised, inhabited by pests, sunburned, decayed, moldy or showing signs of blossom end rot. A small imperfection can be cut out of the tomato and discarded, but the tomato should be generally unblemished to ensure that it does not carry harmful bacteria and that it will be acidic enough for canning.
If you have tomatoes from a dead or frost-killed vine, save them for relish or other pickling recipes. They are not acidic enough for general canning recipes, sauces or salsas.
Use the right equipment
Amazon is a great place to save money on canning supplies. Super Saver shipping provides free delivery of qualified orders of $25 or more. The following items are essential for canning.
- Water bath canner (ridged bottom for gas stovetops, flat bottom for electric stove tops.)
- Rack
- Jar lifter
- Lid lifter
- Funnel
- Bubble remover/headspace tool
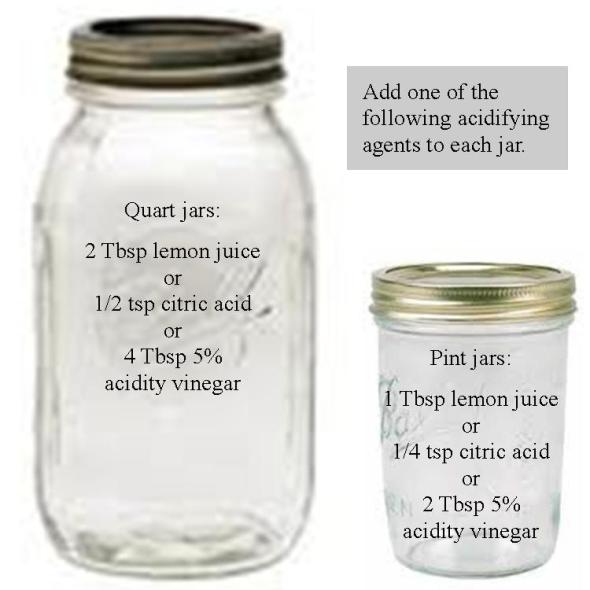
 Ensure safe acidity in whole, crushed, or juiced tomatoes by adding acid to your empty jars.
Dangerous microorganisms, such as the bacteria that causes Botulism, thrive in alkaline foods. A pH of 4.6 or lower is required for safe canning in a boiling water canner. The USDA recommends that an acidifier be added to all canned tomatoes and tomato products.
To maintain a safe pH in your jars, do not use baking soda or butter to soften the acid bite. They will decrease the acidity in your jars. If you would like to use them to improve the taste of sauces, add them just prior to consuming, NOT during the canning process.
Note also that using vinegar will change the taste of your finished product, so lemon juice or citric acid are often the preferred sources of acid.
Preparation
Sterilize jars, lids and rings
Gather new or used glass canning jars and rings. Always use brand new self-sealing lids. Wash jars, rings and lids in hot water and detergent. Rinse thoroughly.
Place jars, right side up, in a boiling-water canner with a rack. Fill the canner with warm water until it is 1 inch above the tops of the jars.
Bring the water to a rapid boil, and boil 10 minutes (follow high altitude guidelines if you live at higher than 1,000 ft.) Reduce the heat to a low setting, and let the jars remain in the hot water. Immediately prior to filling them, remove and drain the jars one at a time, reserving the hot water in the canner for use in processing the jars after you fill them.
Lids and rings can be sterilized in the same pot as the jars, or you can boil them separately in a smaller saucepan. After boiling for several minutes, use the lid lifter to retrieve them from the hot water, and place them on new, clean paper towels. Allow them to dry and handle them as little as possible to avoid contaminating them with germs that may be on your hands.
Economical canning jars
Glass canning jars and metal screw bands are a wonderful investment, as they can be used over and over again. I have found that they are less expensive to buy on Amazon than they are in the grocery store.
Filling jars
Follow your chosen recipe to prepare food for canning. Whether you have chosen to can diced tomatoes, sauce, ketchup or salsa , immediately after preparing your recipe, remove sterilized jars from the canner and quickly add your chosen acidifier to each jar. Then fill the jars with hot food, using a wide-mouth funnel.
Release air bubbles by inserting a clean spatula, knife or bubble tool between the food and the sides of the jar (plastic tools only; no metal!) Move the spatula up and down slowly around the inside of the jar to encourage air bubbles to escape.
Clean the jar exterior and rim with a damp paper towel to prevent seal failures caused by food particles sticking to the jar rim or threads.
Place a lid onto the mouth of the jar, gasket-side down. Then fit the screw band over the flat lid, tightening just to resistance. Do not over-tighten lids.
Fill jars to the proper level
Headspace is an empty area left at the top of a canning jar. As a general rule, fill jars to just below the threads on the jar, unless your recipe says otherwise. Different food and preparation techniques require differing amounts of headspace. One-half inch is standard for tomatoes canned in a boiling water canner.
Processing filled jars
How to use a boiling water canner
When water boils, some of the liquid is lost due to steam and evaporation. Have a small pot of extra boiling water to add to the canner, as necessary, if water level decreases during processing. A teapot works well for this purpose.
Fill the canner half way with water (or use the sterilizing water.) Preheat water to 180°F for hot-packed jars.
Load filled jars into a canner rack and lower them into the water using handles. Or, lower the empty rack into the water and add the jars individually with a jar lifter. The lifter should be positioned securely below the screw band to prevent a dropped jar.
Keep jars upright at all times. Tilting the jars could cause food to flow into the sealing area of the lid, causing an improper seal.
As necessary, add more water so that the level remains at 1 inch above jar tops. For process times greater than 30 minutes, start with a water level of at least 2 inches above the jar tops to maintain proper depth as steam escapes the pot.
Turn the burner on high and place the lid on the canner. Heat water to a rolling boil.
The canner should remain covered and water should be kept at a vigorous boil throughout the entire recommended process time. If water boils over, reduce heat a bit, maintaining a full boil. If water stops boiling during the process, turn up the heat. Once a full rolling boil is achieved, start timing the process over from the beginning.
Removing jars from the canner
When the recommended processing time is complete, turn the heat off and remove lid from the canner. Allow the pot to sit for five minutes before removing the jars.
Using a jar lifter or the canner handles and oven mitts, remove the jars and place them on a clean towel, rack or cutting board. Allow at least a 1-inch space between the jars to allow for airflow during cooling. Leave jars to sit undisturbed at room temperature for 12 to 24 hours.
Testing jar seals
Press the center of the lid with your finger. If the lid springs back or clicks when you lift your finger, the lid is not sealed.
Tap the lid with the bottom of a metal spoon. It will make a high, ringing sound if it is sealed properly. If the sound is dull, the lid may not be sealed or food may be touching the underside of the lid.
Hold the jar at eye level and look across the lid. The lid should be concave (curved down slightly in the center). If center of the lid is either flat or bulging, it may not be sealed.
If you discover that a jar has not sealed properly, place it in the fridge and use it first. Or, empty the jar, reheat the food, and reprocess with a fresh lid.
Storing canned foods
Label and date jars. I have often assumed that I will remember the contents of a jar and when I prepared it, but experience has shown me that this is not the case. Labeling allows you to always be certain of the contents. Rotation of stock is facilitated by dating jars.
Store jars in a dark, cool, dry place. Light and heat can compromise food quality. Moisture can cause rings and lids to rust.
Do not let jars freeze. However, if an accidental freeze happens, check jar seals. If seals are still intact, the jars can continue to be stored safely.
Tips and Techniques
How to peel a tomato
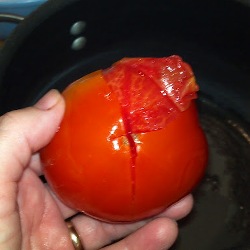 Choosing only firm, ripe tomatoes, cut an ‘X’ in the bottom of each tomato. Gently lower the tomatoes into a pot of boiling water. Boil tomatoes for 2 minutes. Then, quickly remove them from the boiling water and immerse them in an ice bath (a bowl or sink filled with enough water and ice to cover the tomatoes.) The cold water will stop the tomatoes from cooking and becoming too mushy to handle.
When tomatoes have cooled, peel tomatoes, beginning at the ‘X.’ Peels should slip off with little resistance. Cut tomatoes in half and remove the seeds. Discard seeds and peels. You tomatoes are now ready for all of your canning and sauce recipes.
Preparing tomatoes for sauce or juice
For tomato juice, you can skip the blanching and peeling procedure, if you prefer.
To prevent tomato juice from separating in the jar, divide tomatoes (peeled or unpeeled) into 1 pound portions. Cut the first pound in quarters and bring to a boil in a sauce pan.
While the first tomatoes are starting to boil, cut the second pound of tomatoes and add them to the pan. Repeat this procedure until all of the tomatoes have been added to the pan. Continue to simmer tomatoes for 10 minutes, crushing the tomatoes with a potato masher as they boil.
Strain the hot tomatoes through a food mill to remove skins and seeds, using the smallest sieve that you have available. Then return the sieved tomatoes to the sauce pan and heat just to the boiling point. Turn off the heat, and add the hot juice to the sterilized jars, which you will have already prepared with an acidifier. Optional: Add a tsp of salt, to taste.
Electric Food Mills
I generally prefer hand-crank food mills. They are easy to use and much easier to clean than an electric mill. But when I have an abundance of tomatoes, more than I want to mill by hand, an electric model comes in handy. Here is the electric mill that I use (and it grinds meat, too!)
Follow canning recipes exactly
Only use tried and true recipes from reliable sources. Follow recipes and canning instructions exactly.
When using recipes with added ingredients, such as onion, green pepper, mushrooms, or other non-acidic ingredients, never add more of those ingredients than the amount for which the recipe calls. Increasing the amount of alkaline ingredients will reduce the acidity and safety of the finished product.
Add sugar if your sauce is too tart. If you want to decrease the acidity to improve the flavor, add a small pinch of baking soda or a pat of butter to the sauce just prior to eating, NOT during the canning process.
More tips for fantastic results
Do not cook tomatoes in an aluminum pot or stir with a metal spoon. The acid in the tomatoes can react with the metal and change the taste of your sauce.
Seeds and skins can add a bitter flavor to canned tomatoes and sauces. I recommend that you always remove them.
Cook sauces slowly in a deep pot for the best flavor.
To hot pack raw foods, such as salsas, without overcooking them, add acid to sterilized jars, then fill them with the raw food. Pour boiling water over the food, leaving the right amount of headspace. Process according to USDA instructions.
Paste tomatoes, such as Roma or San Marzano, are recommended for sauces due to their sweeter flavor and high pulp content.
If at first you don’t succeed, try, try again!
There are so many varieties of tomatoes, and they range widely in flavor, texture and acidity. Experiment with different varieties and recipes to find the ones you love. Sometimes, after hours of labor, a recipe just does not turn out well. It happens to everyone, even seasoned chefs! Be willing to go back to the drawing board and try again.
Keep a record of recipes and techniques that you have used, saving the ones you love and discarding the ones that are not as appealing. Nothing is worse than opening a jar in December that you processed in July, finding it to be delicious, and not remembering where you got the recipe!
Good luck and enjoy!
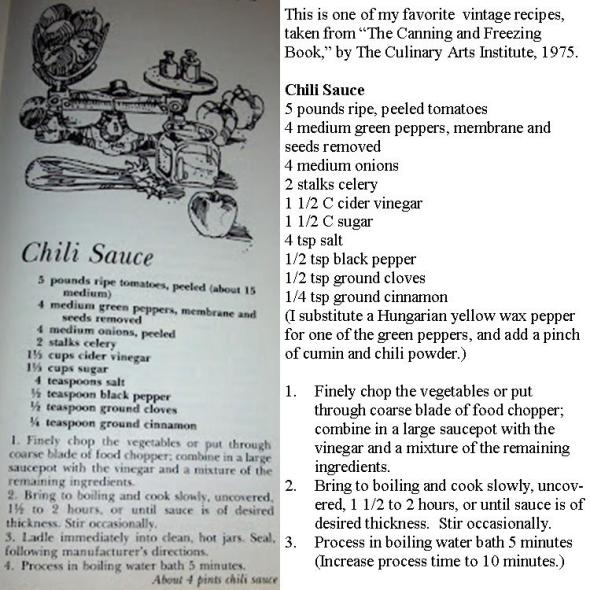
 An oldie, but a goodie!
Though I have revised this recipe, I have not significantly changed the ratios of acid to alkaline ingredients. I recommend increasing the processing time to 10 minutes, to conform to current safety standards.
Recommended Resources
- The 7 foods experts won’t eat | Healthy Living – Yahoo! Shine
Learn more about the risks associated with consuming tomatoes that are preserved in commercial metal cans. - Botulism
Botulism can be controlled with awareness of the types of botulism, conditions affecting the growth of the toxin-producing spores, symptoms, treatment and prevention. - Recipes for canning late season or frost damage tomatoes
Don’t throw frost damaged tomatoes away. Here are some tips and recipes for using them. - Directions for Home Water Bath Canning: Step by Step Instructions to Use your Waterbath Canner
These easy to follow directions to home boiling water bath canning provide a step-by-step guide and serve as a reminder to the steps in home canning food with a waterbath canner. If you lost the manual, these directions will serve as a replacement an - How to Make and Can Tomato Juice
How to Make and Can Tomato Juice at Home in 10 easy steps – fully illustrated, with complete, simple recipe and directions. These are the easiest directions on the web! The directions work for strawberry, blackberry, boysenberry, loganberry, raspberr - Safe Salsa Recipe
Published by NDSU, this publication explains the necessity of a proper pH for canning safety, and provides a safe salsa canning recipe. - Canning Tomatoes – Recipes
Canning tomatoes: recipes for canning tomatoes, methods and processing times